-
07
Jul 2022
- Category: Design Tech
Utilizing the Zazzle Design Tool - Text
You're searchng Zazzle for a birthday gift for your BFF and you find the perfect product. There's only one problem--when you use the template to add the name for personalization it's too long to fit in the alotted space. Or, maybe you have the opporsite problem--the name is really short and it looks a bit "off" for some reason. Quite possibly, you many love the design, but you really dislike the font. You can move on from this design and spend a lot of time looking for another design that you may or may not like as well, or you can utilize the Zazzle design tool. I'd like to with you how you can make this design work for your needs in a few simple steps.
MAKING YOUR TEXT FIT THE SPACE
The firs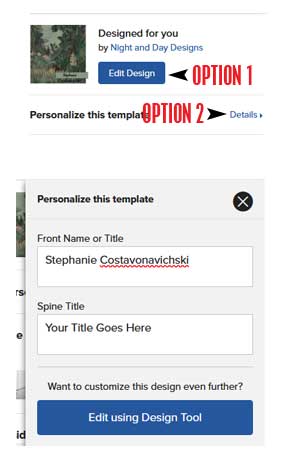 t thing you need to do is open the Zazzle design tool. Option 1: There may be a blue button at the top right under the designers name--this button will take you to the design tool. Option 2: Next to the "Persoanlize this template" statement you will see "Details". Click/Touch this button to open up the template area. Below the template fields you will see a large button that says "Edit Using Design Tool".
This is the open design tool. The red circle on the bottom is the text we want to improve, and the red circle on the left is the "font size" tool we will use to make it fit. Before you begin make sure you have the correct text layer chosen in the layers palette (the chosen layer will be highlighted blue).
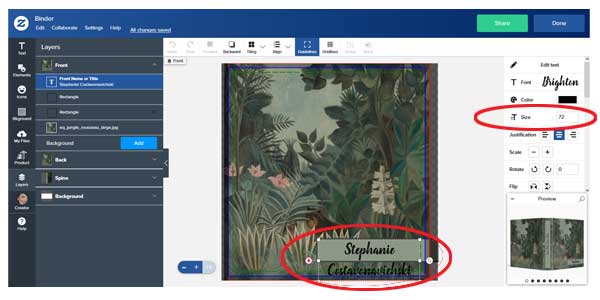
Notice the text box surround the name. It is perfectly sized and postioned to put the name in the middle of the light green background box. This being said, the easiest way to make this text fit will be to change the text size. Find the "Text Size" box on the right hand side of the design tool. Click into the box and highlight the number in the box. Change it to any number that is smaller than the current number--I like to use 10 digit intervals. Keep lowering the number until you find the look you want. You may have to go up or down just a couple of digits to get the exact fit you're looking for. If you click on the thumbnail pic on the bottom right you will be able to preview your changes. When you are satisfied with your changes, clilck "done" at the top right, and proceed as normal to purchase your product.
Other helpful text tools
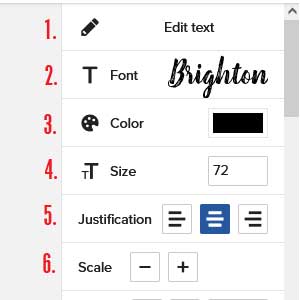
All of these opttions are available to you help you manipulate text inside the Zazzle design tool.
1. Edit Text: Any changes to the text can be made here. Please note that not all text in a design can always be edited in this way. Some designs may have text uploaded by the creator as a graphic and therefore it can't be edited with this text tool.
2. Font: This button will drop down a large menu of available fonts. You can choose any font in the list, but keep in mind that all fonts are not created equal--some fonts may be much smaller or larger than the one chosen by the creator for the original design and may require edititng the size.
3. Color: There is an array of colors to choose from, and if you're familiar with hex codes, those can be used also. You can also choose colors that match the design by clicking on the "eye dropper" in the color palette.
4. Size: Make the font smaller or larger by changing the number in the box.
5. Justification: Align the text left, center or right.
6. Scale: Change the size of the font up or down using the plus or minus buttons
Note: This tutorial will work on most Zazzle designs, but be aware that when publishing products for sale some designers choose to disallow the option for the customer to make any changes aside from the personaizations they have templated. If that's the case and you still love the design, contact the creator and most are more than happy to help you get just what you want.
I plan on showing you more design tool tips in the future. If you have a particular area that you'd like to learn about please let me know in the comments below.
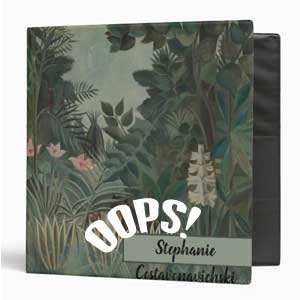
See my Equatoral Jungle Personalized Binder here.
